Google Drive restricted file sharing still creates publicly accessible link – This is a critical security issue

I have come across a critical security issue with Google Drive file sharing.

When you set file sharing to “Restricted – Only people added can open with this link” then only people that you have specifically added should be able to view the document and they should be forced to login before they can view the document.

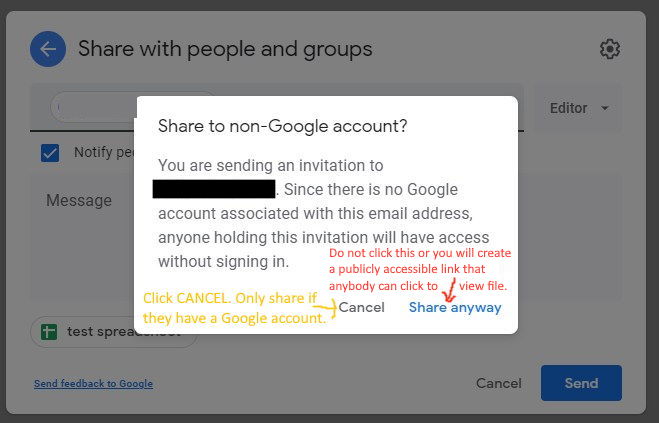
However, if you share the Restricted file with a non-Google email, you will get a poorly worded popup that asks you if you want to Share Anyway:

What is very unclear, is that if you click on Share Anyway, then a publicly accessible link is created that anybody can use to view the file now, even without logging in to Google.

And what is worse, is that the file status still shows as “Restricted: Only people added can open with this link” when in reality the file status should be changed to “Anyone with the link can view the file”.

This is a Critical Security issue.

When a file is set to RESTRICTED, it should only be viewable by those added that have a Google account to login with first, and should NEVER be viewable by anybody else even if they have the link.

Another -1 for Google 🙁

Here is thread on Stackoverflow:
https://stackoverflow.com/questions/71130234/critical-security-issue-with-google-drive-when-sharing-file-as-restricted

Here is a link on the Google Issue Tracker:
https://issuetracker.google.com/issues/215152601

How to convert Presearch tokens (PRE) to ETH (or BTC or cash) – PRE tokens

Presearch is working on a decentralized search engine: https://presearch.io/

Their crypto currency token is PRE

I have built up some PRE by using their search engine, and wanted to cash them out but found the process was not very easy because many exchanges do not accept PRE and therefore won’t exchanage it. So it took me several days to figure out how to do it.

STEP 1
Follow Presearchs own instruction by creating a wallet with My Ether Wallet (https://www.myetherwallet.com) and withdraw your tokens and send them to your new MEW wallet.

STEP 2
In order to exchange your PRE for something else, you will need to have some ETH in your MEW wallet to pay for the gas.
I found .005 ETH was a good minimum number.
You will need to purchase the ETH on another exchange and then send it to your MEW wallet.

STEP 3
NOTE: I recently noticed that CoinGetCoin.com website is no longer working. If you have alternative suggestion, please post in the comments.
You can then use CoinGetCoin to make the exchange (https://coingetcoin.com/#how-it-works).
You tell it how many PRE you will send, and it will tell you how many ETH you will get back.
I like this platform because you just send the PRE and it will automatically send ETH back to your wallet.
Specify the approximate amount of PRE you are going to send (does not need to be exact), and then specify the wallet address where you want the ETH sent after the exchange (I just sent it back to my MEW wallet).
CoinGetCoin will then give you a wallet address and you have 24 hours to send your PRE.
Be sure to note the minimum PRE that they will accept.

STEP 4
Go back to your MEW wallet and specify the address CoinGetCoin gave you, and send your PRE.
You can go back to CoinGetCoin and it will tell the progress (when it receives your PRE and when it sent the ETH back).
I have made a couple exchanges using CoinGetCoin and it took less than 30 minutes each time.

STEP 5
Now that you have ETH in your My Ether Wallet instead of PRE, you can do what you want with it.
For me, I sent it to my Coinsquare.com account and converted it to dollars and withdrew it to my bank account.

FREE codec for playing HEVC h.265 video on Windows 10

I was having an issue where my Windows 10 computer would not play HEVC h.265 video.

When you try to play the video, Windows Movies & TV app opens, but says it can not play it and that you need to purchase a $0.99 plugin from the Microsoft Store.

But there is actually a FREE version of codec that you can install/launch from the Microsoft Store as well (but of course they do not tell you about it).
Its called:

HEVC Video Extensions from Device Manufacturer
https://www.microsoft.com/en-us/p/hevc-video-extensions-from-device-manufacturer/9n4wgh0z6vhq

Alternate link:
https://www.microsoft.com/en-us/p/hevc-video-extensions-from-device-manufacturer/9n4wgh0z6vhq?irgwc=1&OCID=AID2000142_aff_7593_159229&tduid=%28ir__hwp9gz9pl9kftzgvkk0sohzize2ximz2ee93rrzl00%29%287593%29%28159229%29%28%29%28UUwpUdUnU56887YYwYg%29&irclickid=_hwp9gz9pl9kftzgvkk0sohzize2ximz2ee93rrzl00&activetab=pivot%3Aoverviewtab

Click the link above (its directly on Microsoft.com), choose GET, open the MICROSOFT STORE, choose INSTALL and then choose LAUNCH.
You do NOT need to sign up and do NOT need to create microsoft account to install this codec. Just skip/ignore any of those requests.

After this, try playing your HEVC h.265 videos with Windows Movies & TV app, and they should play!

Shopify: How to add External Link Buy Now button and remove Add To Cart button

I have some products (eBooks) that are only available to purchase on Amazon so I needed a way to add a BUY NOW ON AMAZON button and also needed to remove the ADD TO CART button.

This solution requires an App that lets you add custom Metadata Fields to your products. I tested a few different free ones, and ended up going with Simple Admin https://apps.shopify.com/simple-meta

This solution also requires adding some custom code to your theme. In this example I am using the free theme called SIMPLE.

STEP 1
Add and install the Simple Admin app to your Shopify store.

STEP 2
Once installed, go to your Apps section and click on Simple Admin to go to its dashboard.

STEP 3
Click on PRODUCTS over in the top right corner.

STEP 4
Choose the product you want add the Buy Now External Link button too, and click the ID number of that product.

STEP 5
Click on the META tab.

STEP 6
Click ADD METAFIELD.

STEP 7
Enter the following information:
KEY: BuyNowText
VALUE: BUY NOW on Amazon.com
VALUE TYPE: String
NAMESPACE: CustomExternalLink
DESCRIPTION: The value is the text the customer will see on the button.
Click SAVE.

STEP 8
Click ADD METAFIELD again.

STEP 9
Enter the following information:
KEY: BuyNowLink
VALUE: https://anydomain.com/some/link/to/product
VALUE TYPE: String
NAMESPACE: CustomExternalLink
DESCRIPTION: Enter external link in the value field. To disable external link, enter the word “none” (without quotes) in the value field.
Click SAVE.

STEP 10
Now go to ONLINE STORE then THEMES then click on ACTIONS for your current theme and choose EDIT CODE.
NOTE: I am using the free SIMPLE theme.

STEP 11
Locate the SECTIONS / PRODUCT-TEMPLATE.LIQUID file and click on it so the file opens up in the editor.
NOTE: The following code that I am going to modify is specific to the SIMPLE theme and is located in the SECTIONS / PRODUCT-TEMPLATE.LIQUID file. The code you are looking for may be slightly different if you are using a different theme, and may also be located in a different file. Another file to check for the code would be the TEMPLATES / PRODUCT.LIQUID file.

STEP 12
Look for the following code:

<div class="product-single__cart-submit-wrapper{% if section.settings.enable_payment_button %} product-single__shopify-payment-btn{% endif %}{% if section.settings.add_to_cart_width == 'full_width' %} product-form--full{% endif %}">
  <button type="submit" name="add" id="AddToCart" class="btn product-single__cart-submit{% if section.settings.add_to_cart_width == 'full_width' %} btn--full{% endif %}{% if section.settings.enable_payment_button %} shopify-payment-btn btn--secondary{% endif %}">
    <span id="AddToCartText">{{ 'products.product.add_to_cart' | t }}</span>
  </button>
  {% if section.settings.enable_payment_button %}
    {{ form | payment_button }}
  {% endif %}
</div>

STEP 13
Replace the code above with this code:

{% comment %}
  MOD by Jeff - Wrapped the DIV with the IF-ELSE statement to show External BUY NOW button.
              - When link is found, the ADD TO CART and BUY NOW buttons will disappear and this button will show instead.
              - Use Simple Admin app to add custom metafields.
              - NAMESPACE: CustomExternalLink
              - KEY: BuyNowLink = enter http link to external site or the word "none" without quotes to disable
              - KEY: BuyNowText = the text you want customer to see
{% endcomment %}
{% if product.metafields.CustomExternalLink.BuyNowLink == blank or product.metafields.CustomExternalLink.BuyNowLink == 'none' %}
<div class="product-single__cart-submit-wrapper{% if section.settings.enable_payment_button %} product-single__shopify-payment-btn{% endif %}{% if section.settings.add_to_cart_width == 'full_width' %} product-form--full{% endif %}">
  <button type="submit" name="add" id="AddToCart" class="btn product-single__cart-submit{% if section.settings.add_to_cart_width == 'full_width' %} btn--full{% endif %}{% if section.settings.enable_payment_button %} shopify-payment-btn btn--secondary{% endif %}">
    <span id="AddToCartText">{{ 'products.product.add_to_cart' | t }}</span>
  </button>
  {% if section.settings.enable_payment_button %}
    {{ form | payment_button }}
  {% endif %}
</div>
{% else %}
  <a href="{{ product.metafields.CustomExternalLink.BuyNowLink }}"><button class="btn" style="background-color:black; pointer-events: none;"><span>{{ product.metafields.CustomExternalLink.BuyNowText }}</span></button></a>
{% endif %}
{% comment %}
  END MOD by Jeff
{% endcomment %}

STEP 14
Click SAVE.

STEP 15
Go view your product and you should see the new BUY NOW button has been added and the ADD TO CART button has been removed.


Enjoy!!!
Thunderbird logging connection issues for POP3 IMAP and SMTP

I came across an issue where Thunderbird appears to be connecting and using PLAIN TEXT authentication, leaving username and password visible, even though I have Authentication set it to SSL/TLS or STARTTLS.

In order to troubleshoot this issue, I found the following article:
https://wiki.mozilla.org/MailNews:Logging

Following the instructions in that article did NOT work!

It says you are supposed to use MOZ_LOG and MOZ_LOG_FILE as of April 2017 however these variables did not work even though it is June 2018. I had to use the old variable names of NSPR_LOG_MODULES and NSPR_LOG_FILE.

The following is the batch file (for Windows 10) that I used and was able to get a log for troubleshooting the authentication and connection to my POP3 and SMTP servers:

set NSPR_LOG_MODULES=negotiateauth:5,POP3:5,SMTP:5,timestamp
set NSPR_LOG_FILE=%USERPROFILE%\Desktop\tb-connect.log
"%ProgramFiles(x86)%\Mozilla Thunderbird\thunderbird.exe"

Using this log I was able to identify that it was indeed using PLAIN TEXT authentication. I am still in the process of trying to determine if this is a Thunderbird bug or a server side bug and will report back with further details when I have them.

I have posted a Bug Report on Thunderbird site in order to track the issue:
https://bugzilla.mozilla.org/show_bug.cgi?id=1467835


Amazon S3 Bucket Policy for Specific Referer URL only

Here is an example bucket policy below for Amazon S3 that will limit it to a Specific Referer and URL only, so that your content can not be linked to from other websites.

{
 "Version": "2012-10-17",
 "Id": "HttpsRefererPolicyForMySite",
 "Statement": [
 {
 "Sid": "AllowGetRequestsReferredUrlSpecificForMySite",
 "Effect": "Allow",
 "Principal": "*",
 "Action": "s3:GetObject",
 "Resource": "arn:aws:s3:::my-bucket-name/*",
 "Condition": {
 "StringLike": {
 "aws:Referer": [
 "https://mysite.com/this-specific-page-only",
 "https://mysite.com/only-child-pages-of-this-page/*",
 "https://mysite.com/this-specific-page-and-child-pages*"
 ]
 }
 }
 },
 {
 "Sid": "ExplicitDenyIfNotUrlSpecificForMySite",
 "Effect": "Deny",
 "Principal": "*",
 "Action": "s3:GetObject",
 "Resource": "arn:aws:s3:::my-bucket-name/*",
 "Condition": {
 "StringNotLike": {
 "aws:Referer": [
 "https://mysite.com/this-specific-page-only",
 "https://mysite.com/only-child-pages-of-this-page/*",
 "https://mysite.com/this-specific-page-and-all-child-pages*"
 ]
 }
 }
 }
 ]
}

As a couple points of interest, note that for one specific URL to work, you should NOT put /* on the end of it. To specify a specific URL, you use it like this:
https://mysite.com/this-specific-page-only

If you specify a URL with /* on the end, then it will only work for children of that URL, not the specific URL itself. For example, if you use this:
https://mysite.com/only-child-pages-of-this-page/*
then content will NOT play on the specific URL https://mysite.com/only-child-pages-of-this-page but WILL only play on https://mysite.com/only-child-pages-of-this-page/any-other-page

So if you want content to be available on your whole site (including the main domain), you will need to include BOTH the following:
https://mysite.com
https://mysite.com/*

However this sitll will not work for a url with extra GET data, such as:
https://mysite.com?data=123

So to include this you need add the * to the end without the slash, and this will inlcude the specific page as well as all child pages:
https://mysite.com*


OSX Bible Verse Screensaver for MacBooks and Macs – KJV and ESV

This is a great OSX Bible Verse Screensaver for your MacBook and Mac. I have modified the ESV Daily Verse Screensaver created by Brett Taylor. His original version is located here http://inner.geek.nz/projects/screensavers/.

The only minor problem with Brett’s original screensaver was that the verse moved around the screen quite fast and non-stop, so it was very hard to actually read and it made you feel kinda sea sick.

My version has been modified to show the verse in one place for 10 seconds and then it will slowly move to a new location. I have also created two versions, one with KJV verse and one with ESV verse so you can choose your preference.

The KJV version gets it’s daily verse from here:
https://www.biblegateway.com/votd/get/?format=atom

The ESV version gets it’s daily verse from here:
http://www.gnpcb.org/esv/share/rss2.0/daily/

HOW TO INSTALL

– Download the .qtz files from here:
KJV version: http://iwebss.com/wp-content/uploads/2016/04/KJV%20Daily%20Verse%20MODIFIED.qtz
ESV version: http://iwebss.com/wp-content/uploads/2016/04/ESV%20Daily%20Verse%20MODIFIED.qtz

– Once downloaded, move the files into the ~/Library/Screen Savers folder in your user folder.

– Then go to your System Preferences > Screen Savers and you should be able to select one of them as your new screen saver.

Let me know what you think by leaving a comment below.