PC style Windows Taskbar on Mac OS X

One of the first things I missed when I switched from Windows to Mac, was the Taskbar along the bottom that shows all my currently open windows. There is nothing wrong with Mac’s Dock, it’s just different and is not a Taskbar. After much searching, I finally found a program that I can use to setup and simulate a Windows Taskbar along the bottom of my Mac OS X (Lion v10.7.2) screen.

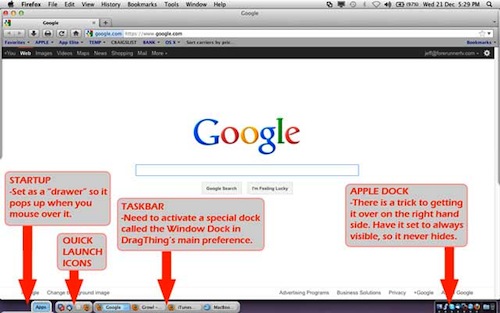
The program is called DragThing. The only downside is that it costs $29 but has a free 30-day trial so you can test it out to see if it’s what you want. But without finding anything else that came even remotely close, I am ok paying the money. Here’s a screen shot:

Windows Taskbar on MacOSX

Windows Taskbar on MacOSX

First thing you need to do is move your Apple Dock to the bottom of the screen and disable Automatically Show And Hide The Dock. If you keep the setting enabled so that the dock automatically hides, then whenever you maximize a window it will go right to the bottom of your screen and cover your taskbar. If the Apple Dock is always visible, then it protects the bottom part of the screen from a maximized window.

If you want to move the Apple Dock over to the right hand side, then open up the Terminal app and type
defaults write com.apple.dock pinning end

Press Enter and then type:
killall Dock
followed by Enter again (the D in Dock must be a capital D or it will not work).

Now download and install DragThing and from the main preferences menu, click on Docks and enable the Window Dock. You will need to rotate the view of this dock, and then under it’s dock options, set Float Dock Window to Always, Show Window Title Bar At Left, Icon Size to 16×16, Spacing to 0, Width to about 70, Show Item Names At Right, and Use Single-Click To Open Items.

You can now resize it so it is only 1 item high, and then drag it down towards the bottom left of your screen. Hold down the shift key before you release the mouse button so it remembers where it is, and then under dock options disable the Show Window Title Bar option.

And there you have it a Windows style Taskbar along the bottom of your Mac!
Making the switch from Windows PC to Mac OS X

My first computer was Commodore 64. From there I went thru a Commodore Amiga, and several PC’s starting with MS-DOS, then Windows 95, Windows 98 and I have now been a Windows XP user for 10+ years and have never bothered to upgrade to Vista or Windows 7 because there was really no significant performance gains, and I just could not be bothered to learn something new!

So why have I all of sudden decided to get a Mac and make the switch? It’s not because I think one platform is better than the other. They both have their strengths and weaknesses, and they are just different. My reason for switching is simple… because I have started iPhone game development, which can only be done on a Mac!

My first choice was to install OS X in a virtual machine running on my PC, but it turns out that Apple’s End User License Agreement says that you have to install their software only on their hardware. In other words, you have to run Apple’s operating system on Apple’s computers! Since I do not want to be carrying two laptops around everywhere I go, I decided on the 13″ MacBook Pro 2.4GHz i5, installed VMware Fusion on it, and have Windows XP running as a virtual machine on it instead.

This transition is not for the faint of heart, especially for us power users! After 10 years of using Windows XP, I know just about every little secret there is on how to tweak and tune it, I know how to figure out just about every little problem that comes along, and (the big one) I know what all the free and open source tools are that need to make my job easier.

If you are a light PC user, who maybe surfs the net and checks your email, then the switch will probably not be a big deal. But if you are a power user like me, then I warn you … it’s been about 2 weeks of sleepless nights “making my Mac work like my PC”, and I am not done yet. Why, you might ask, would I want my Mac to work like a PC? Well having done things a certain way for years, means there are certain keystroke combinations that I always use that no longer work on a Mac! And I did not realize how much I would miss my Taskbar along the bottom of the screen.

The other issue to consider is cost. Since Windows can run on any manufacturers hardware, there is lots of competition to drive the price down. So equivalent hardware on an Apple is usually 25% to 75% more expensive.

Here are some other related posts that will be helpful:

PC style Windows Taskbar on Mac OS X

PC style Windows Keyboard shortcuts on Mac OS X

Windows style Minimize All Windows & Show Desktop on Mac OS X

Fix HTML Hover Drop Down Menu Issue for iOS Devices using CSS only and no JavaScript

After I first setup this website and got it up running how I wanted, I decided to navigate thru it on my iPad to see how it looked. Across the top, I have some navigation buttons, which are just simple links that you can click and follow, which all worked as expected on my iPad, except for the one that says More Stuff. On a desktop or laptop, if you hover your mouse over the More Stuff button, an additional list of links will automatically drop down. But the problem with iOS devices, is that they do not use a mouse and therefore have no “hover” event, so this particular button appeared dead on my iPad and did nothing when you tapped it.

I am really not opposed to using JavaScript solutions, but when I came across this solution that used only CSS, it intrigued me enough to try and implement it.

Thanks to Philip Renich at elfboy.com for the post where I got this information from:
Click here to go to original article
The best way I can explain how it works, is that you need to setup the <ul> tag as display:none; and then when it is tapped, it changes to display:block;.

You also need to wrap the button name in an <a> tag so it is clickable, but set the href="#" so it does not actually do anything when you click it.

And lastly, may need to adjust what the <a> tag looks like when you hover over it (for example, I do not want it to be underlined like the rest of the links on my site when you hover over it, so I used text-decoration:none;


Here is the CSS you will need to add to your style sheet:


#nav_ios ul {
display: none;
}
#nav_ios li:hover ul {
display: block;
}
#nav_ios_no_underline {
text-decoration: none;
}


Here is my HTML navigation menu code that is fixed and works correctly with iPhone and iPad:

<div>
 <ul>
  <li>
   <a title="Home" href="https://www.iwebss.com">Home</a>
  </li>
  <li>
   <a title="BLOG" href="https://www.iwebss.com/blog">BLOG</a>
  </li>
  <li>
   <a title="Contact Us" href="https://www.iwebss.com/contact">Contact Us</a>
  </li>
  <li>
   <ul id="nav_ios">
    <li>
     <a href="#" id="nav_ios_no_underline">More Stuff</a>
     <ul>
      <li>
       <a title="Energy+" href="https://www.iwebss.com/energy">Energy+</a>
      </li>
      <li>
       <a title="Super Maze 3D" href="https://www.iwebss.com/supermaze3d">Super Maze 3D</a>
      </li>
     </ul>
    </li>
   </ul>
  </li>
  <div style="clear:both;height:0px;"><!----></div>
 </ul>
</div>

Let me know if you think this was helpful by leaving a comment!

My Favorite WordPress Plugins

Just want to give a shout out to my favorite WordPress plugins. Here they are, in no particular order:

Bad Behavior – http://bad-behavior.ioerror.us/
Prevents spam without having to use CAPTCHA.

BM Custom Login – http://www.binarymoon.co.uk/projects/bm-custom-login/ 
Customize your WordPress login screen.

Developer Formatter – http://wordpress.org/extend/plugins/devformatter/ 
Uses GeSHi server-side highlighting to display your code in a post.

Fast Secure Contact Form – http://www.fastsecurecontactform.com/ 
Contact form. 

HTML Purified – http://urbangiraffe.com/plugins/html-purified/ 
Replaces default HTML filters. 

Link Indication – http://sw-guide.de/wordpress/plugins/link-indication-plugin/ 
Open external links in new window. 

Ozh’ Admin Drop Down Menu – http://planetozh.com/blog/my-projects/wordpress-admin-menu-drop-down-css/ 
A much better Admin menu plugin. 

Sociable for WordPress 3.0 – http://wordpress.org/extend/plugins/sociable-30/ 
Let people easily link to your post thru social networks. 

the_excerpt Reloaded – http://robsnotebook.com/the-excerpt-reloaded/ 
A much better excerpt plugin for your posts. 

WP-PageNavi – http://wordpress.org/extend/plugins/wp-pagenavi/ 
Page navigation. 

WYSIWYG Inline Code Command – http://wordpress.org/extend/plugins/wysiwyg-inline-code-command/ 
Easily add inline code to your post.

Windows Screen Resolution will not Save

I was having an issue with my Windows XP laptop, where I would change the screen resolution under settings, but everytime I re-booted it would start up in the correct resolution, and then about 30 seconds after boot, it would switch back to the old resolution. It was very annoying because I had to reset the resolution every day, and it used to work correctly for three years prior to this.

After searching the internet, I did come across several posts about checking registry settings. So I checked all the registry settings and they were all correct. This stumped me for few months and then one day while checking the programs that Startup at boot time I noticed NvCpl (NVIDIA Control Panel) and realized that I had found the source of my woes!

The problem was that I was using Windows Settings to change the resolution, but at some point I had also used NVIDIA Control Panel to change the resolution, so once NVIDIA started up, it was changing the resolution back to the old setting.

HOW TO FIX IT:
In order to fix it, I had to remove NVIDIA from the list of Startup programs. There are two programs that need to be removed. They are:
NvCpl     RUNDLL.EXE C:\WINDOWS\system32\nvcpl.dll,NvStartup
RunDLL32  RUNDLL.EXE NcMCTray.dll,NvTaskBarInit

In Windows XP choose Start then Run then type msconfig.

In Windows Vista or Windows 7 choose Start then type msconfig in the SEARCH box.

Now choose the Startup tab, and look for the two items mentioned above and uncheck them.

Press OK and then you can Restart Now or Restart later.

Your screen resolution should now be fixed!

Permalinks and Categories Paging Problem: Page Navigation Fix

I started using WordPress at about version 2.5 and when I customized my permalinks, I had a problem when there was more than one page. Only the first page of posts would display, and clicking Previous or Next to all other pages showed up as “404 sorry, nothing found!” The paging problem has something to with WordPress thinking that /page/ is a sub-category name as opposed to being a reference to a specific page.

So here is a very small plugin that attempts to fix the problem:

Click here to download the WP-PageNavigation Fix plugin.

I remember for sure that it worked in WP v2.7 and 2.8 but have not tested it on any other older versions, although it should probably work without a problem. The problem does not seem to be present in WP v3+ so I have not needed to use the plugin anymore since upgrading, but maybe somebody else has come across the problem.

Thanks to Doug Smith at http://barefootdevelopment.blogspot.com/2007/11/fix-for-wordpress-paging-problem.html

Remove and Ignore Password Protection on Subdirectories with htaccess

If you are using Basic Auth in your .htaccess file to protect a directory on your server, by default, it also protects all subdirectories as well. But what if you have one particular subfolder that you want to unprotected, and you want the password ignored or removed?

There is a very easy solution!

Create a new .htaccess file with:
Satisfy Any
on its own line, and place this in the subdirectory that you do NOT want to be password protected.

Note that all the subdirectories under this unprotected subdirectory will also become unprotected, so you may need to add new Basic Auth .htaccess files to these subdirectories if you want them protected as well.